How Can I Get My Text to Stretch in Word Art
Guide font formatting, change stretch and create artistic text in Word
Later inbound the text content, users will demand to reformat the unabridged font, alter the stretch, align or can decorate the text if desired to increment the appeal of the text content.
- Give-and-take 2013 Complete Tutorial (Part 9): Use Line and Paragraph Spacing
- Instructions to alter the numeric style when listing a list used in Word
Usually after completing the input of the text, we will need to perform operations to align the margins, change the format, change the font for the unabridged text. Or some text will require a higher level that is busy with artistic words to brand the content more vivid. And then how tin yous change the format of the entire content in the article? In the article below, Network Administrator volition guide yous to read the steps to reformat the font, change the text stretch and create creative text with many different styles on Word.
i. How to format fonts in Word:
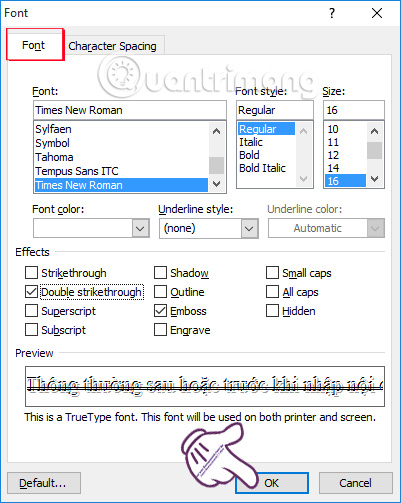
Footstep one:
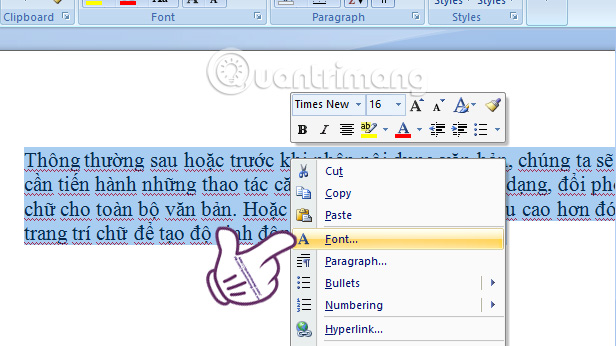
First you lot open the content of the text you want to format the font. Side by side, highlight the text or text to be formatted, correct-click and select Font . Or we can printing Ctrl + D.

Step 2:
Next, in the Font window interface, there are many formatting options for us to utilize.
- Font: users can choose different fonts to apply to their text. Nevertheless, you should note, choosing the word format in Word needs to match the Lawmaking and Typing method of Vietnamese input method, to avert error cases when typing.
- Font style : choose fonts such as bold, italic, underline or just lowercase. After blackening the text, you can utilise Give-and-take Ctrl + B shortcut to create bold text, Ctrl + I to create italicized text, Ctrl + U to create underlined text, combine 2 or all three groups Use this shortcut to create text that is bold, italic, or bold and underlined, .
- Part Size : select the size for the entire blackened paragraph.
- Font color : select the colour for the text.
- Underline manner : use the types of guys to underline the text.
- Underline color : select the colour for the underlined line under the text.
The above 6 sections are vi basic options when users want to format text. In addition, y'all can likewise use some of the other effects in Furnishings , with 11 different upshot types, including:
- Strikethrough: Text between words.
- Double strikethrough: Double tiles between letters.
- Superscript: The above alphabetize or use Ctrl + Shift + =.
- Subscript: Index below or Ctrl + =.
- Shadow: Create glossy text.
- Outline: The text has an outline.
- Emboss: Highlight (white) first.
- Engrave: Translucent letters (white) later.
- Small caps: Small capital letters.
- All caps: Large capital letters.
- Hidden: Hide text in text.
Beneath is the Preview section so we can preview the font format when applied. Finally click OK to save the formatting changes to the highlighted text.
In addition, if we just want a simple and quick format for the text, we can immediately utilise the editing items highlighted in blood-red every bit shown below.
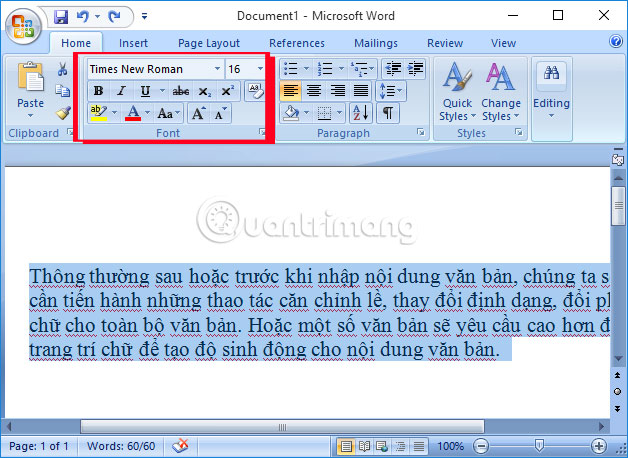
Inside:
- B is bold
- I is italic
- U is underlined
If you want the text to exist both bold and italic, only highlight the text and select both B and I. Similar to other styles.
2. Alter word stretch in Discussion:
Afterwards we enter the text, y'all can also alter the stretch betwixt the words, to brand it stand up out in the entire text.
Step 1:
You also highlight the text that needs to change the stretch. Right-click and select Font .
Footstep 2:
In the Font window interface, select the Character spacing tab.
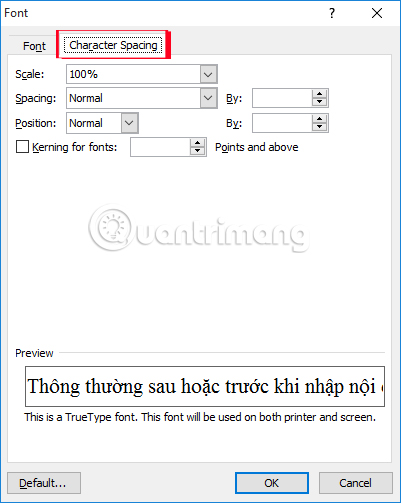
Footstep iii:
In this section, we will have iii items to choose from:
- Scale: Format of word extension in%
- Spacing: The distance between letters. Click on By to select the sparse size or stretch the text quickly.
- Position: Position in line. Click By to bring the text position college than the line, or downward from the line.
- Default: Default text scaling for later file content.
You can look at the Preview section to check whether the stretch is matched to the requirements. Finally click OK to relieve.

3. Create art typefaces for Word:
Step 1:
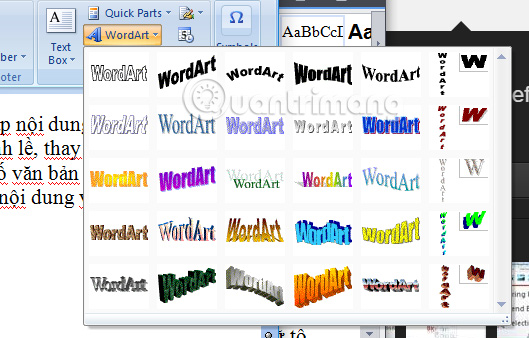
Offset of all, nosotros will besides black out the text to be styled . In the Ribbon , click the Insert item and select WordArt .

Step 2:
As soon equally we click on it, you volition run across a list of lots of creative fonts, shadows, italics, assuming letters, etc. Yous choose a typeface to apply.
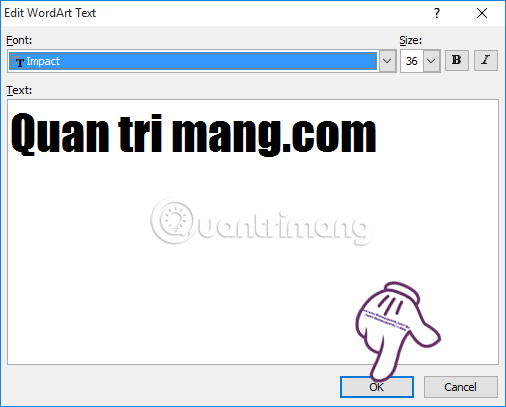
Step iii:
Side by side, the Edit WordArt Text window volition appear. Here, users can choose the font, font style, font size format. So click OK to apply.
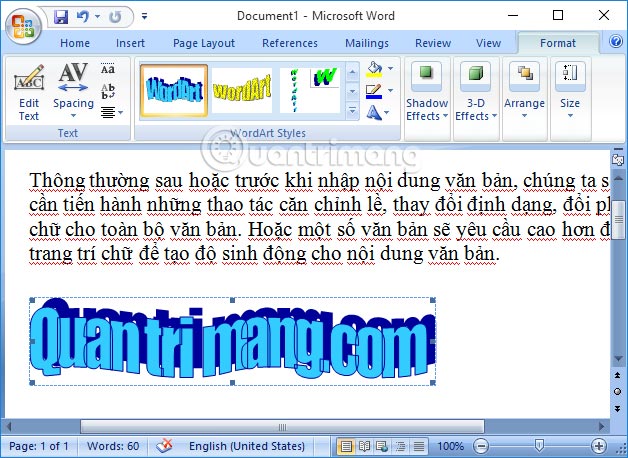
Shortly, the typeface will announced in the content. You can stretch or compress the text by clicking on the two-dimensional arrow at the corners and edges of the art word, and and then dragging it in the direction y'all desire.
The above is a basic guide for yous to change the font, adjust the stretch distance of the text and create creative text in the Discussion text content. With these changes, text content will look more than cute, unique and strange when nosotros have new word combinations by manipulating the text format above.
Refer to the following articles:
- Create a quick dot (……………) line in Microsoft Word
- eight tips or handling columns in Microsoft Give-and-take
- Instructions for printing two-sided paper in Word, PDF, Excel
I wish you all success!
Source: https://tipsmake.com/guide-font-formatting-change-stretch-and-create-artistic-text-in-word
0 Response to "How Can I Get My Text to Stretch in Word Art"
Post a Comment